Wednesday, June 6, 2012

How to Easily Decorate Above Your Upper Kitchen Cabinets

In considering decorating above my kitchen cabinets, I considered fake plants, but hate the idea of constantly dusting them.  I was not really sure what direction to head, so I left the space empty and unused.  My mom and I were chatting about this particular issue and she brought up the fact that my Grandmother would use copper jello molds to decorate.  Running with that idea I wanted to intersperse vintage signage and vintage jello molds.

Off to the thrift stores I went.  I also spent some time on Etsy.com locating some great finds.  I purchased several jello molds from Goodwill, Salvation Army and Etsy.com.  I also found a large circular piece.  I decided this should be my center.

Before Clean Up

My center needed a bit of clean up.  Nothing too aggressive, so I used Goof Off wipes that I found at Home Depot.  Quick and efficient clean up.


After Clean Up
Now, onto the other pieces I had located.  I used another Goof Off Wipe and cleaned them up, as well.


I needed to drill a hole into the top of my "center" piece.  I used a drill bit and had a hole in a second.  I then placed the beginning of my design.


Obviously, the kitchen is undergoing other projects at this time as well.  I am using Polycarbonate Glass for Cabinet inserts.  I am waiting for the film to come into Walmart so that can be applied.  The protective film is still on at this point to protect from scratching.  Also, the fluorescent lighting is done in my kitchen being replaced by a refinished chandelier.

From the point of my center, I selected pieces to add to the wall. I did not want all circles or everything completely level.  However, I am still a Virgo and need a bit of a pattern.  So I selected specific items to work with each other.  I like to imagine this process like reading a book.  Left to right...does it make sense?

I hammered the nails in and placed the remainder of the pieces.  I found picture stands at thrift stores for $1 each and used those to anchor my signs.  I wanted a little depth so I chose not to hang them.
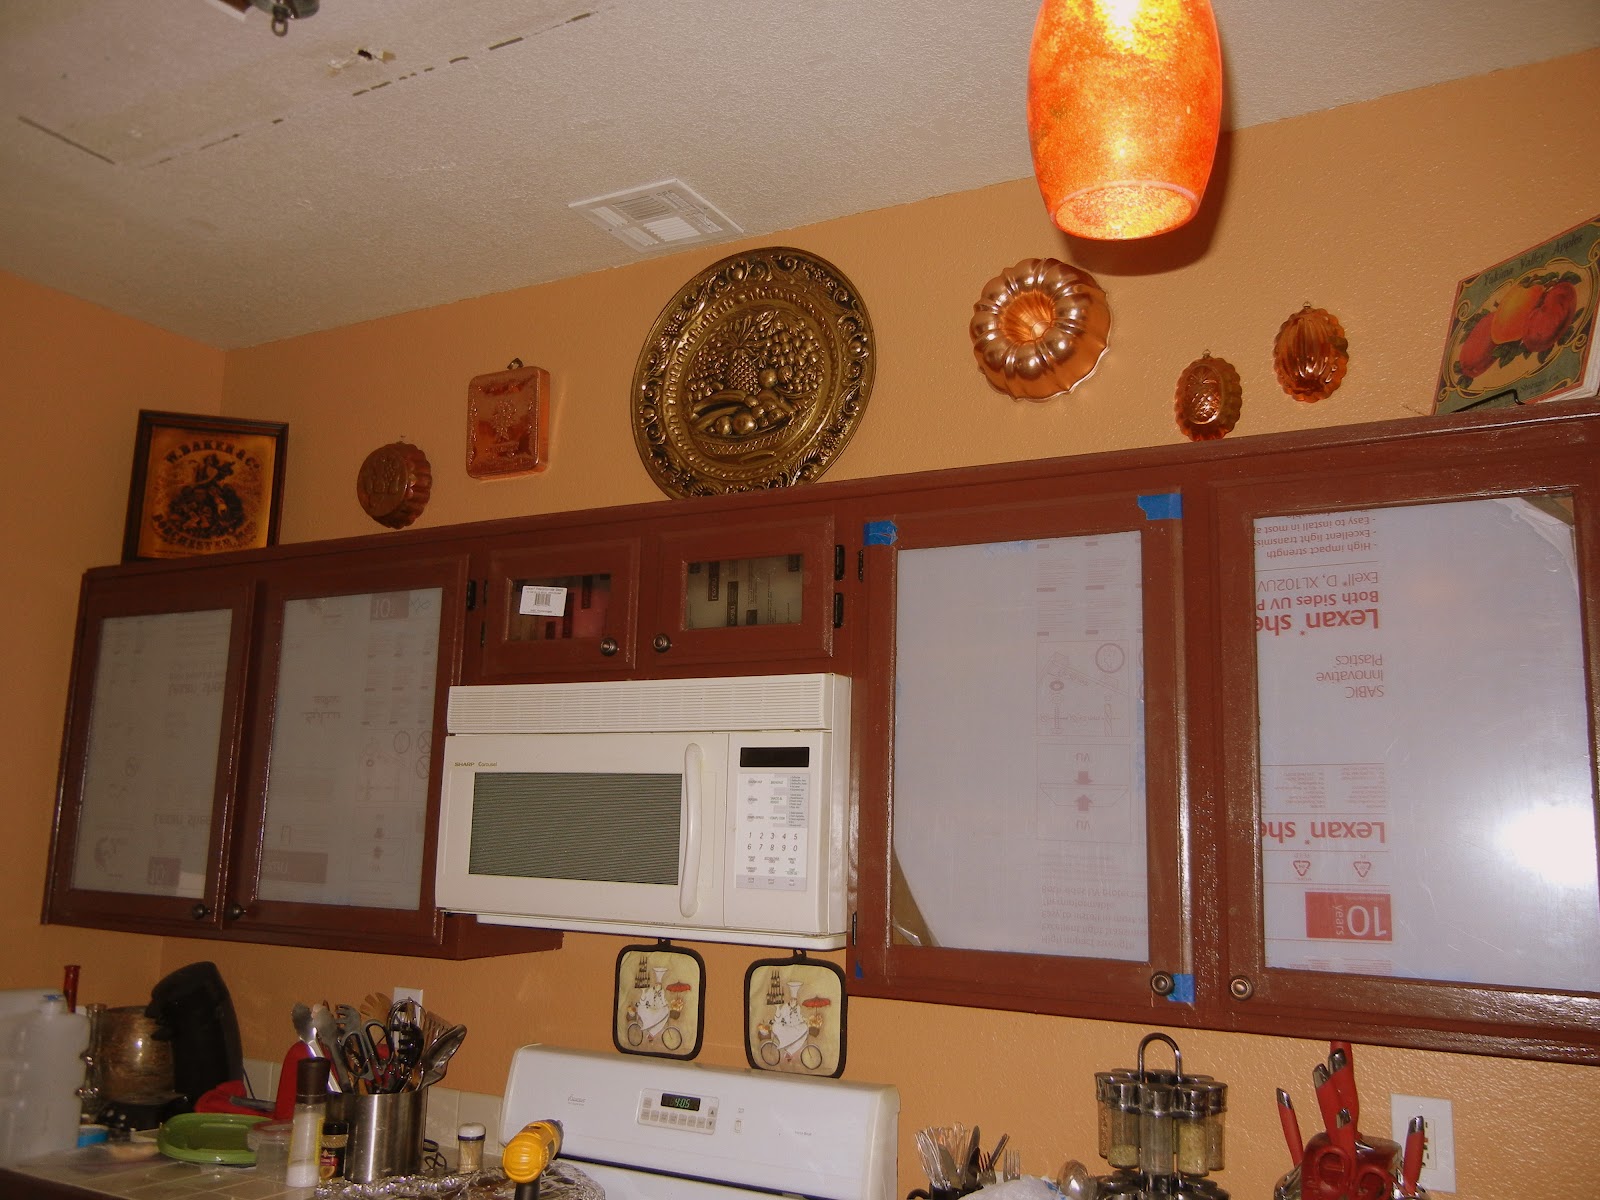
Upper Cabinet Kitchen Decor
I was a little nervous about mixing all of the different metals.  I also considered more clean up on a couple pieces, but decided I like the vintage feel more.  Moral of the story...go for it!  I think it looks great.  I added some elegance to my kitchen for about $50 for all pieces. 

I may still add another horizontal sign or two...but that is why this addiction is never ending and always fulfilling.

Tuesday, June 5, 2012

How To Host a Brown Bag Wine Tasting Party

A fun idea I stole from my friend Zel who stole it from another friend is a Wine Tasting Party.  Simple and fun! 

First:  Choose a Wine (Cabernet Sauvignon is always a favorite)
Second:  Set a Price Cap ($15 per bottle of wine)
Third:  Invite Some friends (each will bring two bottles of wine)
Fourth:  Get some brown paper wine bottle bags (your grocery store will give them to you)
Fifth:  Appetizers, palette cleansers, water, etc

Every month we are trying to host at one of our houses.  As guests arrive, the wine is taken to a secret location (shhhh).  Then one bottle from each person is logged with an assigned number.  The wine is then bagged and taped or rubber banded and the number written on the bag.  You can get fancier with your bags, if you like.  I like the brown bag irony when drinking wine at a wine party.

The wine is brought out and everyone takes a tasting of all wine.  You can have pre-printed sheets with a rating system you create.  Or, if you are me, I just handed out notepads and pens.  1st, 2nd and Last were selected.  Parties differ in size which can contribute to determining the method of voting.  I went easy, because I had around 16 people.  Most of the time the party is around 6-10 people.

As people take tastes, they note the rating or their favorites.  The fun of this party is that this can take a couple hours of mingling and tasting.  When everyone is completed with their tasting, the score cards are collected.  These score cards determine:

1st Place:  Takes the majority of the second bottles home that they select first.
2nd Place:  Takes a few bottles that are leftover.
Last Place:  Takes their own bottle of wine home.

A great time is had and it is truly amazing how different everyone's palette really is as some enjoy bold while others enjoy mild.  I like to serve cucumber sandwiches, chocolates, oyster crackers, goldfish, and meat/cheese trays.


Make sure your guests are truly aware of the wine selection.  I selected Syrah and people showed up with Shiraz.  No need to panic, disclose the information and have a good time!

"In Vino Veritas!" ~~> "There is Truth in Wine!"

Test Kitchen: How To Make "Explosive Showerhead Cleaner"

My quest continues now that I have become obsessed with the idea of homemade remedies for little money. A household problem I have that impacts quite a few people in Las Vegas is hard water stains.  My shower head is big and constantly afflicted with hard water stains.

Enter the Frugally Sustainable website I located via Pinterest.  An easy recipe for removing hard water stains from your shower head.  How could I pass on testing this one out?

Recipe Directions are listed below from the website (http://frugallysustainable.com/2011/11/explosive-showerhead-cleaner/).

1/3 cup Baking Soda
1 Cup White Vinegar
1 large, plastic bag
Twist Tie

"1. Mix baking soda and vinegar in bag over a sink. Caution: Pour vinegar into bag slowly, there is an “explosive” foaming action that kicks in.
2. Place bag over showerhead. Be sure it is submerged in the baking soda/vinegar solution.
3. Secure with twisty tie.
4. Let the showerhead soak in the solution overnight or for at least 2-3 hours.
5. Wipe off showerhead prior to use."
 
Keep in mind, my shower head is large.  I tripled the solution above.  Then the bag was a little too heavy for my twist tie to hold.  I used painters tape since I have so much of it from all of the paint projects.
 
Dark Shower head and Hard Water is not a good combination.
As you can see above, my shower head was not completely submerged in the baking soda portion.  Maybe taping it up higher would have worked better?
 

I call this a 90% improvement.  Even dry the hard water stains are almost gone.  I did the soak for about 3 hours.  I plan on doing this simple trick again in a few months.  Notes to self: get the shower head more submerged into the baking soda portion and soak overnight as indicated in directions.

I am a fan of this one and the other items on the blog.  So much so, I added the Frugally Sustainable Blog link to my page.
 

Monday, June 4, 2012

Test Kitchen: How To Make " Homemade Dish Detergent"

Another test completed in my test kitchen includes making my own dishwasher detergent.  The money savings did not play into this decision.  Instead, I was interested in seeing if something will work better than my current store bought items. 

I think my dishwasher may be on the fritz, last leg, etc.  I use Jet Dry and all sorts of goods to try to make sure that my dishes no longer have a cloudy effect.  I read an article about homemade dishwasher detergent.  This article talks about the discontinuation of phosphate in dish detergents that have resulted in cloudy effects on dishes.  People have been replacing dishwashers.

Sounded very similar to my plea, so using the article (http://www.onegoodthingbyjillee.com/2012/02/homemade-dishwasher-detergent-revised.html) I went about locating the simple ingredients to be combined for homemade dish detergent.

1 cup washing soda
1 cup Borax
1/4 cup Kosher Salt
2 packets of Lemon Kool-Aid (unsweetened)

Combining these with a couple drops of dish soap, I ran a load of dishes and hoped this would mean not spending any money on a new dishwasher.  I would rather buy new shoes or carpet for my bedroom.


Well, this is the result.  There went my dreams of not buying a new dishwasher.  I call this one a failure in my test kitchen.  However, that may not be fair.  It really could be the dishwasher at this point, and if that is the case...my test kitchen has too many outlying variables to reach a solid conclusion.

Test Kitchen: Testing "Baking Soda as Silver Polish"

In continuation of my science projects in the home, I decided I wanted to try an easy solution for bringing life back to silver.  I recently made a $1 purchase of a silver tray, I am going to give to my mom in setting up a tray decor design in her kitchen.  I hope she likes the idea.

The silver tray has nice details on it and I wanted to bring it back to life and shine it up a bit.  I found an article at RealSimple.com (http://www.realsimple.com/new-uses-for-old-things/new-uses-cleaning/print-index.html) that seemed to be the answer.

Before
Using Baking Soda, salt and water I completed the directions listed in the article:

"To polish silver: Wash items, then place on aluminum foil in the bottom of a pot. Add a baking-soda solution (¼ cup soda, a few teaspoons salt, 1 quart boiling water) and cover for a few seconds."

During
After
This was working really well.  I could already see a difference in the cleanliness of the silver tray.

I went back to take another look about an hour later and this is what I found.

A bit filmy?
I think there is a step missing in getting rid of the filminess.  I will work on cleaning this further with plain soap and water and see what happens.  Right now...I call this one...half successful.

Test Kitchen: Testing "How To Make Homemade Laundry Detergent"

I've been doing research on easy "How To's" on the Internet via blogs, articles and Pinterest.  Some that stuck out to me like great ideas include "How To Make Your Homemade Laundry Detergent", "Making Your Own Dishwash Detergent", "Cleaning Hard Water Stains from Your Showerhead", and "Baking Soda as Silver Polish".  This post and more to follow has everything to do with my effort to follow these easy directions and get the same results.

How To Make Your Own Laundry Detergent

I found a blog post by WhyNotSew (http://whynotsew.blogspot.ca/2010/08/how-to-make-homemade-laundry-detergent.html) and decided it seemed simple enough and had cost savings listed that were great.  $6.00 for 600 loads of laundry.  I am ready to throw out Tide and give this one a whirl. 

First, I went to locate the items at Walmart.  I had so much faith in this process working, I bought several boxes of each.  You don't need to do this as one box of each will do several batches.  I have issues purchasing just one of anything.

Borax (1 cup)
Washing Soda (1 cup)
Bar of Soap
2 Gallons of Water

Additional Items needed:

One Large Pot
One Long Stirrer
Grater
Funnel

I started by shredding the soap.  I like Caress, so that was the soap I chose.


I added the shredded soap and one gallon of water to the big pot.  It took about 15 minutes for the soap to dissolve. 


Once dissolved, I added the Borax and the Washing Soda.  You need to bring this to a boil so the items start coagulating.  This took some time.  About an hour and a half or so.  It could be my pot, as it is pretty hefty and takes a while to get anything boiling.

Once that has completed, remove pot from the heat and add a gallon of cold water, stirring well. 


I let my batch sit for a couple hours, then stirred again.  I used the funnel as instructed to get the batch into my two empty gallon containers.  At first, this was a pain.  But, then I realized that this process was actually assisting in de-clumping a bit of the batch that I did not stir well enough.  I got the batch into two jugs and shook them pretty good.


I used a cup in my load of laundry.  The waiting...then the washer was done!  I checked the laundry and it looks good to me!  The clothes are clean, no crazy smell and no crazy colors.  Whew!  I put them in the dryer, did another review, and am happy to say I am calling this one a success! 

I have a lot of loads of laundry to do until the next batch.  Oh wait...I was bragging to my brother about this recipe and now he wants a batch.

A friend has asked me if this recipe is resulting in any filminess on the clothes as she had read that previously.  I have not laundered the same clothes enough to answer that one, but will follow up.

Exploring the Kitchen: How To Cook an Easy Pasta Casserole

Sometimes, it is fun to throw a whole lot of delicious items into one pan or casserole dish and call it dinner.  The other night, I decided I wanted to try a Pasta Casserole of my own creation.

My mother would sometimes make lasagna in a pan.  This was all ingredients from lasagna in a pan and stirred.  This was always a favorite and absolutely delicious.  Inspired by this I began putting lasagna like items in a casserole dish.

Pasta Casserole
16 oz Wheat Penne Pasta
2 cups of washed, fresh spinach leaves
6 oz jar of Artichoke Hearts (chopped)
4.25 oz can of Sliced Black Olives
24 oz Tomato Sauce (I like Classico)
19.5 oz Turkey Sausage (I like Hot Italian style for some kick)
15 oz Ricotta Cheese (part Skim)
8 oz Mozzarella Shredded Cheese - Skim (double depending on how much you like cheese)
Basil
Pepper
Salt
Extra Virgin Olive Oil

Preheat oven to 350 degrees.

Start by cooking the pasta as designated on the container.  About 12 minutes should do it.  I like to add a bit of olive oil and salt to the boiling water.  Olive oil to make sure the noodles don't stick.  Salt adds a bit of flavor for the noodles.  I use about a teaspoon of each.

Turkey sausage does not have as much fat in it as Italian sausage, so I use a teaspoon of olive oil so the meat does not stick to the pan.  First, remove the sausage from the wrapping and chop.  Add to the heated pan and add basil (fresh or from the spice rack).  I enjoy basil.  I use about 2 tablespoons.  Cook Italian sausage all the way through.  Continuously chop or break the sausage apart.  This should take about 15-20 minutes.

In a large casserole dish, add some pasta sauce (about 1/4 of the jar).  Then add about half of the noodles.  Add some more pasta sauce.  You should have used about half of the bottle by now.  Mix the noodles and pasta sauce together.  Add ricotta cheese by adding chunks and spreading the cheese through the noodles gently so you don't mush the noodles (I use the back of a regular spoon).

Add the turkey sausage and mix thoroughly adding a little more pasta sauce.  Add the remainder of the noodles, olives, artichoke hearts (chopped) and spinach (uncooked).  Add the remainder of the pasta sauce and mix all together.  Sprinkle cheese over the top evenly.  Sprinkle the top of the casserole with basil for the taste and the fact it just makes it look prettier.

Bake for about 30-35 minutes or until the cheese is melted.  I use skim cheese versus non-fat cheese as I have found non-fat cheese does not like to melt as easily.

And dinner is served!  Serve with a salad with a light vinaigrette, Italian Tuscan Bread and some wine.  Enjoy!