Showing posts with label kitchen. Show all posts

Saturday, June 16, 2012

How To Transform Kitchen Cabinets Cheaply

I have a very small kitchen and had the wonderful idea of painting it a deep red when I moved in.  As time has passed, I realized my mistake and that the color was drowning out my kitchen.  Plus, my cabinets are cheap and yellowy in color.  So, transformation time in my kitchen.

Before
First necessity was a paint color.  I needed something to work with my living area while defining my kitchen space. I was looking for a more elegant and chilled out color.  So, I went to Home Depot and picked up samples in peach and brown.  I painted them on a wall and selected Applesauce Cake by Behr.  The nice thing about samples... they are a couple dollars a piece and help ensure that you are happy with your decision before putting a lot of money and work into the wrong paint color.

Applesauce Cake by Behr
Next thought...cabinets.  I am not in the market to spend a lot of money so buying new cabinets was not the ideal decision.  The decision process first started with: to STAIN or to PAINT the cabinets.  After doing some research, it turned out the decision was fairly simple.  If you appreciate the wood grain then stain.  If you don't care about the wood grain then paint.  I selected the paint option.

Going back to Home Depot, I selected several samples ranging from mahogany to brown.  I painted the samples on the interior of the cabinet and selected rich mahogany.


Take the cabinets down with a drill by removing the screws that hold up the brackets for the cabinets.  The cabinet inserts can be removed at this time and not painted if you plan on replacing them.  Using a skill saw you can cut out the inserts.  Also, remove the inner ledge from the cabinet doors.  Saving these inserts will assist in cutting out the replacement pieces. 

Paint one coat, let it dry overnight and paint another coat.  Add polyurethane as you deem necessary for the sheen you are grabbing.  I selected satin paint for ease of cleaning, but opted to add some polyurethane to contain the color better and add more sheen.

While the cabinets are down, also paint the cabinet structure with two coats of paint.


Spray paint the brackets while they are off the cabinets.  I used black spray paint. Again, two coats are recommended. 

Upon drying use the brackets and drill to screw the doors back into the cabinet structure.

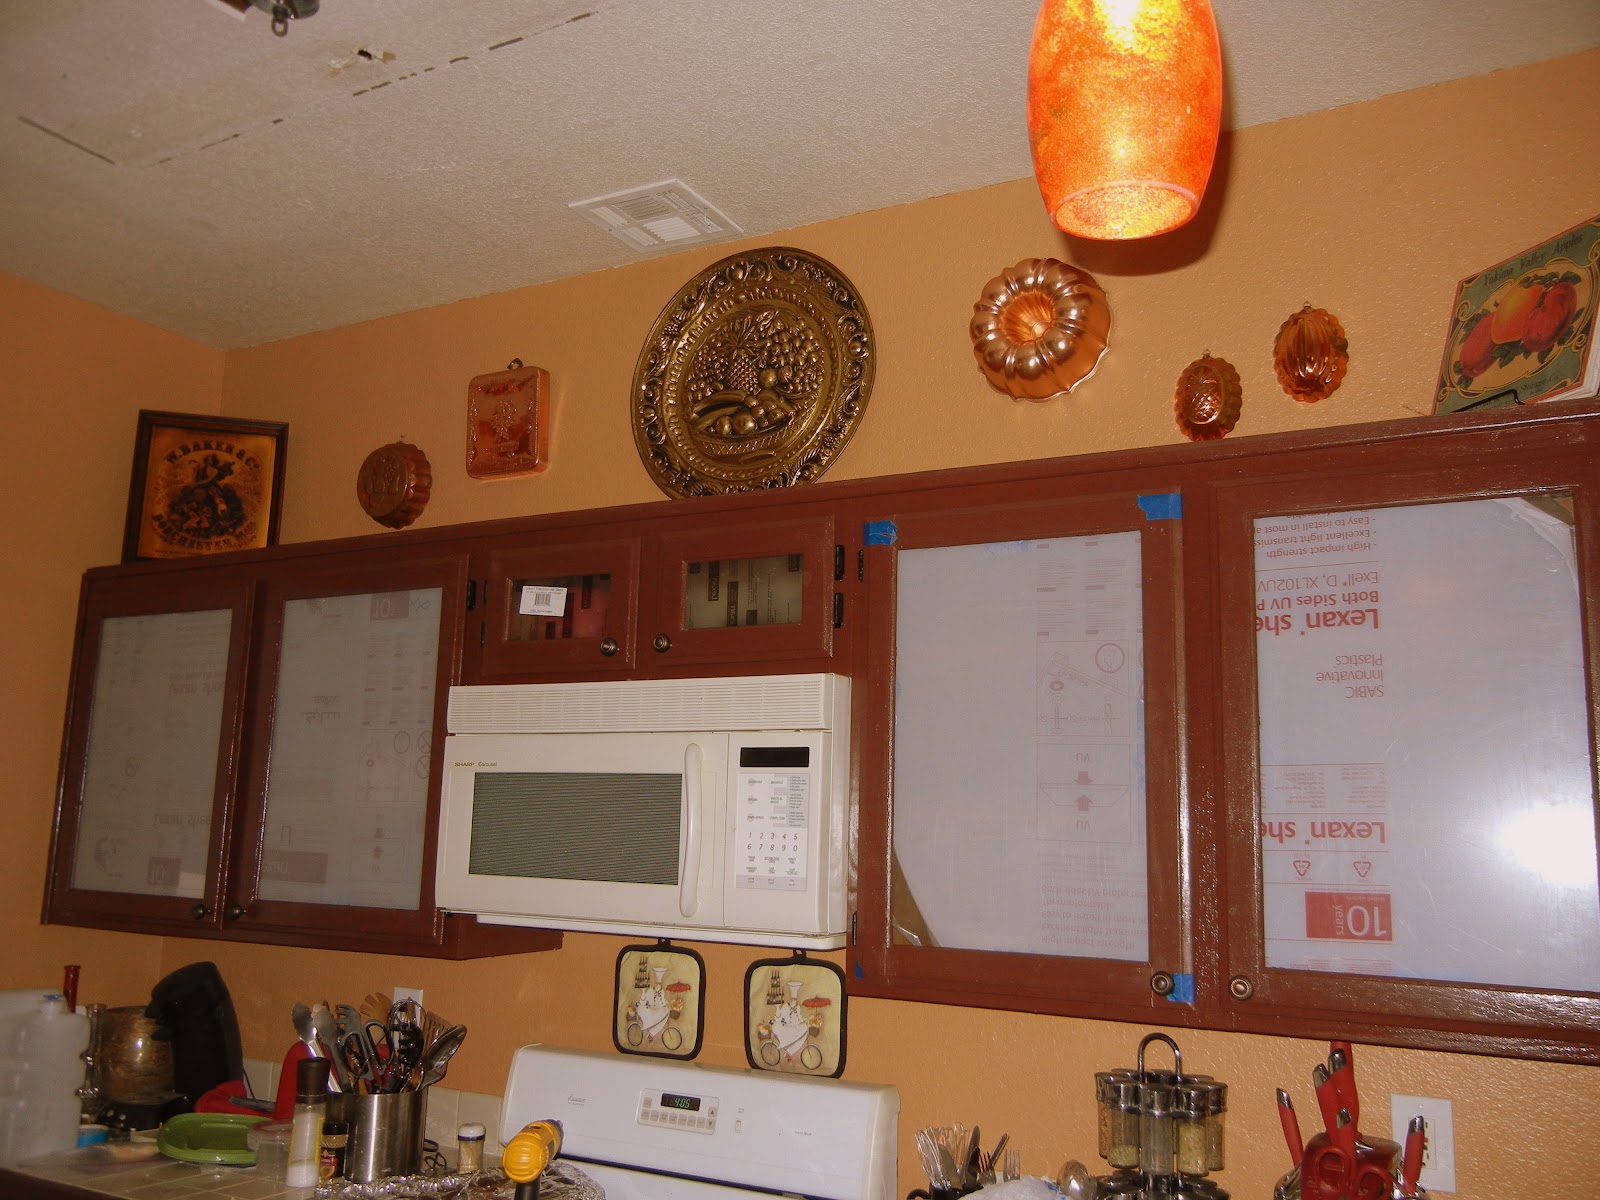
If you are using something else for the cabinet inserts, now is the time to get busy on those pieces.  In this case, I elected to use polycarbonate glass.  One piece worked for all of my upper cabinets and can be located at Home Depot for $50. 

The nice thing about polycarbonate glass is that it is light but still sturdy, economical and can easily be worked into a design.  I found that the beveled glass inserts were about $25 per square foot.  Polycarbonate sounded better and better to me!

Using a circular saw, you can cut the polycarbonate glass to fit the inserts you have saved from the cabinets.  Some articles lead you to believe that a razor can be used to cut this glass and that is WRONG.  You need something sturdier.


I ordered some regular glass film from WalMart.  You may need fancier and more expensive cabinet glass film if your cabinets have a lot of direct sunlight.  If not, then you can use the $25 per roll selection that I grabbed.  I order in Mosaic and waited the week for it to be delivered to the store.  I ordered two rolls, but only needed one.  This can easily be returned to your Walmart store by grabbing an online return receipt from the website.


The scene is set...a squeegee, spray bottle with water, glass cleaner, razor and the Lexan polycarbonate glass cut to fit the cabinets.  First, clean the polycarbonate glass and then spray with water.


You can actually use less water than pictured above.  Actually, it is better to use less water as the film will become slippery.

Unroll the film on the table, place the polycarbonate glass on top and use the razor to outline the glass and cut through the film. 

Remove the backing and place on the glass.  You can continue to place the film until you have the fit you want.  The nice thing with this process is that there is not any glue application, which allows some room for initial error.


Spray the top of the film with some more water.  Then, using the squeegee, lightly but deftly flatten the film out until it fits perfectly to the glass.  Keep in mind, there is not glue involved so it can still slip.  This process is dependant on static from the polycarbonate glass and the water application.


I also used a paper towel to clean the excess water from the top.  Then, flip over the glass and trim the remainder of the film using the razor knife.


Once completed, place in the divot of the cabinet.  You can use masking tape to hold the piece in place while you apply the glue.


We used Tub & Tile sealant in clear as the glue to place the glass.  Using the sealant, apply a line of sealant to the bottom and top of the glass on the interior of the cabinet.  The sealant needs to be used on the glass portion of the insert and NOT on the film itself. 

Leave the film facing out.  This will allow for easy clean up in the future as well.  A nice note to this process, is knowing that fingerprints will not be an issue down the road as it would be with actual glass.


Continue to use the masking tape while the sealant dries.  Allow to dry overnight and then apply a second coat and remove the masking tape.


Adding hardware can do great things for cabinets, as well.  It also reduces the need for additional clean up as paws will only be working with the hardware rather than the entire door.  I located a set on EBay for $20 and used it for all of my cabinets and drawers.  Drill a hole and attach using the screws that come with the hardware.


Voila!  $95 gave my kitchen cabinets the uplift they needed including the hardware.  Now, I am adding to my to do list...the painting of the shelf lips.  Also, during this makeover, I updated with decor above my cabinets (see previous blog).

A big journey for my kitchen cabinets, but I feel like they are all grown up!!

Now onto the appliances...I think black will do nicely.  And, no...I will not be replacing them.  I checked out black appliance paint and it is $30 for a six pack.  I smell some more home redressing!

Wednesday, June 6, 2012

How to Easily Decorate Above Your Upper Kitchen Cabinets

In considering decorating above my kitchen cabinets, I considered fake plants, but hate the idea of constantly dusting them.  I was not really sure what direction to head, so I left the space empty and unused.  My mom and I were chatting about this particular issue and she brought up the fact that my Grandmother would use copper jello molds to decorate.  Running with that idea I wanted to intersperse vintage signage and vintage jello molds.

Off to the thrift stores I went.  I also spent some time on Etsy.com locating some great finds.  I purchased several jello molds from Goodwill, Salvation Army and Etsy.com.  I also found a large circular piece.  I decided this should be my center.

Before Clean Up

My center needed a bit of clean up.  Nothing too aggressive, so I used Goof Off wipes that I found at Home Depot.  Quick and efficient clean up.


After Clean Up
Now, onto the other pieces I had located.  I used another Goof Off Wipe and cleaned them up, as well.


I needed to drill a hole into the top of my "center" piece.  I used a drill bit and had a hole in a second.  I then placed the beginning of my design.


Obviously, the kitchen is undergoing other projects at this time as well.  I am using Polycarbonate Glass for Cabinet inserts.  I am waiting for the film to come into Walmart so that can be applied.  The protective film is still on at this point to protect from scratching.  Also, the fluorescent lighting is done in my kitchen being replaced by a refinished chandelier.

From the point of my center, I selected pieces to add to the wall. I did not want all circles or everything completely level.  However, I am still a Virgo and need a bit of a pattern.  So I selected specific items to work with each other.  I like to imagine this process like reading a book.  Left to right...does it make sense?

I hammered the nails in and placed the remainder of the pieces.  I found picture stands at thrift stores for $1 each and used those to anchor my signs.  I wanted a little depth so I chose not to hang them.

Upper Cabinet Kitchen Decor
I was a little nervous about mixing all of the different metals.  I also considered more clean up on a couple pieces, but decided I like the vintage feel more.  Moral of the story...go for it!  I think it looks great.  I added some elegance to my kitchen for about $50 for all pieces. 

I may still add another horizontal sign or two...but that is why this addiction is never ending and always fulfilling.

Monday, June 4, 2012

Exploring the Kitchen: How To Cook an Easy Pasta Casserole

Sometimes, it is fun to throw a whole lot of delicious items into one pan or casserole dish and call it dinner.  The other night, I decided I wanted to try a Pasta Casserole of my own creation.

My mother would sometimes make lasagna in a pan.  This was all ingredients from lasagna in a pan and stirred.  This was always a favorite and absolutely delicious.  Inspired by this I began putting lasagna like items in a casserole dish.

Pasta Casserole
16 oz Wheat Penne Pasta
2 cups of washed, fresh spinach leaves
6 oz jar of Artichoke Hearts (chopped)
4.25 oz can of Sliced Black Olives
24 oz Tomato Sauce (I like Classico)
19.5 oz Turkey Sausage (I like Hot Italian style for some kick)
15 oz Ricotta Cheese (part Skim)
8 oz Mozzarella Shredded Cheese - Skim (double depending on how much you like cheese)
Basil
Pepper
Salt
Extra Virgin Olive Oil

Preheat oven to 350 degrees.

Start by cooking the pasta as designated on the container.  About 12 minutes should do it.  I like to add a bit of olive oil and salt to the boiling water.  Olive oil to make sure the noodles don't stick.  Salt adds a bit of flavor for the noodles.  I use about a teaspoon of each.

Turkey sausage does not have as much fat in it as Italian sausage, so I use a teaspoon of olive oil so the meat does not stick to the pan.  First, remove the sausage from the wrapping and chop.  Add to the heated pan and add basil (fresh or from the spice rack).  I enjoy basil.  I use about 2 tablespoons.  Cook Italian sausage all the way through.  Continuously chop or break the sausage apart.  This should take about 15-20 minutes.

In a large casserole dish, add some pasta sauce (about 1/4 of the jar).  Then add about half of the noodles.  Add some more pasta sauce.  You should have used about half of the bottle by now.  Mix the noodles and pasta sauce together.  Add ricotta cheese by adding chunks and spreading the cheese through the noodles gently so you don't mush the noodles (I use the back of a regular spoon).

Add the turkey sausage and mix thoroughly adding a little more pasta sauce.  Add the remainder of the noodles, olives, artichoke hearts (chopped) and spinach (uncooked).  Add the remainder of the pasta sauce and mix all together.  Sprinkle cheese over the top evenly.  Sprinkle the top of the casserole with basil for the taste and the fact it just makes it look prettier.

Bake for about 30-35 minutes or until the cheese is melted.  I use skim cheese versus non-fat cheese as I have found non-fat cheese does not like to melt as easily.

And dinner is served!  Serve with a salad with a light vinaigrette, Italian Tuscan Bread and some wine.  Enjoy!