Showing posts with label Copper. Show all posts

Wednesday, June 6, 2012

How to Easily Decorate Above Your Upper Kitchen Cabinets

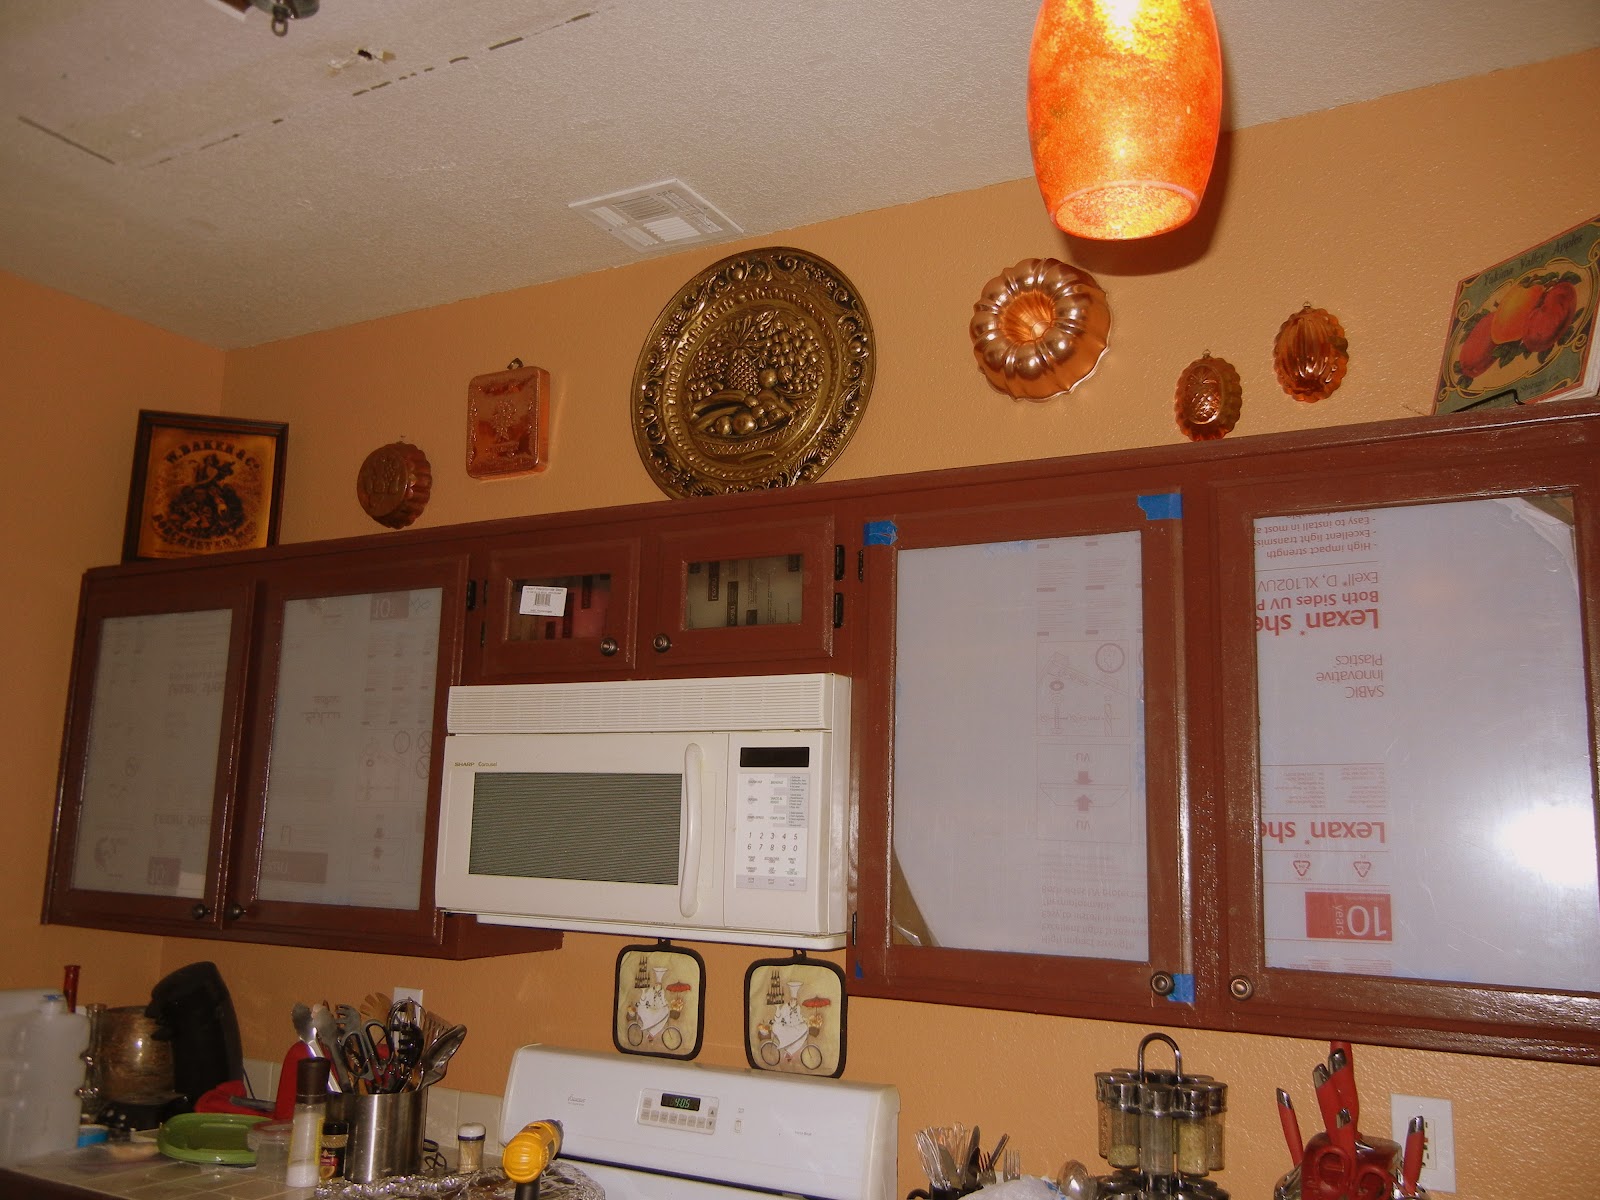
In considering decorating above my kitchen cabinets, I considered fake plants, but hate the idea of constantly dusting them.  I was not really sure what direction to head, so I left the space empty and unused.  My mom and I were chatting about this particular issue and she brought up the fact that my Grandmother would use copper jello molds to decorate.  Running with that idea I wanted to intersperse vintage signage and vintage jello molds.

Off to the thrift stores I went.  I also spent some time on Etsy.com locating some great finds.  I purchased several jello molds from Goodwill, Salvation Army and Etsy.com.  I also found a large circular piece.  I decided this should be my center.

Before Clean Up

My center needed a bit of clean up.  Nothing too aggressive, so I used Goof Off wipes that I found at Home Depot.  Quick and efficient clean up.


After Clean Up
Now, onto the other pieces I had located.  I used another Goof Off Wipe and cleaned them up, as well.


I needed to drill a hole into the top of my "center" piece.  I used a drill bit and had a hole in a second.  I then placed the beginning of my design.


Obviously, the kitchen is undergoing other projects at this time as well.  I am using Polycarbonate Glass for Cabinet inserts.  I am waiting for the film to come into Walmart so that can be applied.  The protective film is still on at this point to protect from scratching.  Also, the fluorescent lighting is done in my kitchen being replaced by a refinished chandelier.

From the point of my center, I selected pieces to add to the wall. I did not want all circles or everything completely level.  However, I am still a Virgo and need a bit of a pattern.  So I selected specific items to work with each other.  I like to imagine this process like reading a book.  Left to right...does it make sense?

I hammered the nails in and placed the remainder of the pieces.  I found picture stands at thrift stores for $1 each and used those to anchor my signs.  I wanted a little depth so I chose not to hang them.

Upper Cabinet Kitchen Decor
I was a little nervous about mixing all of the different metals.  I also considered more clean up on a couple pieces, but decided I like the vintage feel more.  Moral of the story...go for it!  I think it looks great.  I added some elegance to my kitchen for about $50 for all pieces. 

I may still add another horizontal sign or two...but that is why this addiction is never ending and always fulfilling.

Monday, May 21, 2012

Building a Frame Out of Chair Railing

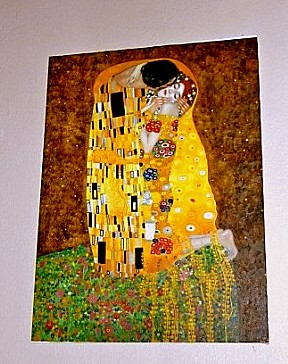
I have a beautiful Klimt "Kiss" oil painting.  A reproduction, of course.  It will work beautifully with the color scheme downstairs.  My Grandma told me when I first moved in that it was too intimate to put downstairs, so I have had it in my bedroom.

Back to the idea of my own rules.  The painting is moving downstairs.  I love it with the color scheme downstairs.  I have talked to my G-ma again and she states she does not recall ever saying that and has proceeded in trying to locate more Klimt reproductions to marry with the "Kiss".

The Kiss by Klimt before the frame is created
My reproduction has some white appearing at the top and since it is being placed in my more elegantly styled downstairs, I decided it needed a frame.  So, as usual I went snooping on the Internet for a 3' by 4' frame to encase my painting.  The frames I liked were a bit more than my wallet liked.  I got to thinking something could be created.  After wandering around Home Depot, I spoke with my very crafty mother and she thought of moulding.  In the moulding area of Home Depot, I located chair railing.  Bingo!

Chair Railing with some nice detailing to keep with an elegant look.
I love some spray paint.  I bought some chair railing for $20 and Hammered Copper Spray Paint for $12.  A wood chisel was also purchased for $8.  I spray painted the two chair rails with the Copper making sure I did clean sweeps when spray painting so I would not get drops or weird blobs.  The nice thing about using spray paint with texture is that you have room for error.

Hammered Copper Spray Paint meets Pine Chair Railing.
The wood chisel allows you to chisel away any additional ledge you may need on the back to fit the picture (and cover the white space in my case). 

Measure width by length for the chair railing.
After allowing the paint to dry and chiseling the ledge, you need to measure the angles (45 degrees).  A miter box (about $10) can be used to cut the angles.  Wood glue the corners together on the painting and attach clamps to allow the glue to dry.

Here is my framed oil painting.
Copper wire and screws (on the upper portion of the frame - far right and left) were used to hang the painting.  This was all purchased at Home Depot for about $5.  At the end of the day, I spent about $155 on this piece.  The piece itself was about $100 at an oil reproduction shop a couple years ago.

I am still debating on adding black, iron corner pieces.  What do you think?  I also think a mate may be better in this space.  The Kiss is center with the living room start but not the windows.  I may be nit picky, but I think this may clarify the space and make a bit more sense with the space available.  Still debating.  This is an ongoing process and my addiction.

Saturday, May 12, 2012

My 1920's Re-Invented Lamps Get Lamp Shades

When you take on a project that you have never endeavored before, it becomes something a bit closer to your heart.  At least, in my opinion.  The re-invention of my 1920' Ebay Lamps came with some pressure to accessorize them correctly with lamp shades.

Re-Invention of a 1920's Lamp (see previous blog for details).

So, how to accentuate my art?  I found some great lamp shades at Lowes.  My boudoir is to be silver, black and purple (see boudoir blog).  These shades are silver when off and purple when on.  How perfect.

I love the color mix of these lamps.
I don't feel that these lamps are that perfect though for a 1920's boudoir.  They needed a little something more.  Maybe some beads on the bottom?  Crystals on the bottom?  I needed some inspiration.  I took the shades into Michael's.  Nothing.  I took my lampshades into Heddie's in Las Vegas and played with beads and crystals.  Bingo!  I thought I was looking for crystals, but really the black beading was calling me.  Not just for the bottom, but the top.

Out comes the hot glue guns and pins to hold in the beading while I confirm my direction.  Out goes the harps from my lamps as modern lamp shapes don't use them.


Now to confirm with the hot glue gun.  Get rid of the little stringies that are inevitable when hot gluing.  Send up a prayer that this will work and meet all of the goals in mind for these poor 1920's lamps.  I do not want to offend them.

I think I accomplished my goals and did these lamps proud.  Artsy, chic, over the top (a bit) and modern.  They light and they make the statement I want from them. 

When lit, these lamps are purple!
At the end of this lamp project, I have spent about $140.  About $70 per lamp with history and a story.
Don't let yourself stand in your own way.  For so long, I did not consider myself artsy or particularly handy.  I have proved that wrong and watch out amateur house redressing world, here I come!

Decorating Behind a Wall Mounted Flat Screen TV

What to do with decoration behind the flat screen TV?  Most people would leave the paint as it is and I probably would have had I not previously made a design blunder.  When I first purchased my house 6 years ago, I decided I had to have a faux Venetian Plaster wall.  I love the Tuscan look.  However, I also loved the mirror hanging above the fireplace.  So, I had the professionals do the faux paint AROUND my mirror.

BIG MISTAKE!!!  Who am I to say what my taste would be in 6 years or what technology would evolve into.  Why would I ever move the mirror?  Don't mirrors make a smaller place look bigger?  Please do not do this to yourself!  Change is inevitable.

My Faux Venetian Plaster "Focal" Wall with the Mirror.
I don't like to spend big money on big ticket items.  I have had the same, HUGE TV from early 2000 in my tiny living room taking up space, because it works.  I held a Super Bowl party at my house this year and my brother brought over his incredible flat screen TV and put it on top of my outdated TV.  I was shocked!  How could my TV's image be so different!!

Is that really my picture quality?
It is at this time that I had to do psychology on myself.  If I keep this same TV, I will never buy a new TV.  So, the next week I called a friend of my brothers who may be interested and sure enough he came and picked up the TV.  Now, I had the whole living room to move the furniture around.  Also, I now had incentive to buy a new TV.

I went out of town for a few weeks.  No worries about not having a TV downstairs.  Then...I was home for a couple weeks.  How do I not have a TV in my downstairs and I had a party coming up!  Still, I am unwilling to spend a lot of money.  I researched a deal on Ebay on a REFURBISHED Smart TV with 1040p, 240 mgh, 3D ability, WIFI accessible, etc.  This TV was a $560 Vizio TV.  I am a fan of Vizio.  So, with a 30 day return policy and many messages to the seller with fear, I purchased it.  I let my brother and uncle play with it.  Test it out...break it!

It has more than passed the test (and that of my brother's TV ability...yay!).  Now, the problem.  I want one focal wall.  To get the TV above the fireplace means...removing the mirror.  There is nothing behind the mirror but a white wall.
Behind the mirror...
I talked to several painters that did not want to try to match the finish.  I tried to find the company who did the original finish and could not locate them.  I considered putting the mirror up and slicing it for a mount.  At the end of the day, I started considering tiles, Mosaic, etc.  What to do?

On a journey to Home Depot for paint on a different part of the house, I noticed some pretty awesome copper back splash.  I went for it and took a chance.  Not so cheap, but neither was the wall.  I bought 6 pieces of copper, wavy back splash from Home Depot and double sided tape. This was about $130.

Kitchen back splash in my Living Room?

Applying this was my Uncle's job as I stood back and aimed for perfection in lining.  It took a couple re dos and leveling, but eventually got it up.  We also used a couple staples from a staple gun in the middle and then added a sturdy mount.  After spending $560 on a TV I was not going for any mount.  I ponied up and spent $90 at Lowe's on a mount that is fully tiltable and adjustable from the wall.

Who knew?  Kitchen back splash?  I watch a lot of HGTV, so why not?  Give it a whirl.  It was a $130 whirl, but if it turned out it would be great!

Kitchen Back splash is about to become the decorative frame to my high end TV!
Needs to come down a bit...
My Uncle and I proceeded with moving the mount down.  Where the holes were initially drilled some copper spray paint fixed it up.  And, now the final product!


This is not for everybody, but I love it.  Why should I have nothing behind the TV...when I could frame it?   Thanks to what I first considered a blunder, I now have an artistic piece behind my TV.  Many people at the party I hosted were impressed and asked what I used to complete the process.

More thinking outside of the box and having an "Anything Goes!" attitude resulted in a piece I am proud of and is unique.  Make your house your own and go for it!  It has been a therapeutic process and I recommend it to everyone!

 Granted I still need to work on the wires...but a plan is in the works, of course!