Showing posts with label Paint. Show all posts

Friday, December 14, 2012

Becoming Inspired By Another's Art: Creating Your Own Artpiece

A few months ago, one of my best friends sent me a link to Pinterest with a piece of art she wanted.  However, she wanted me to create it.  I said...sure, no problem.  A few months passed and the opportunity presented itself to create the art piece.  Another best friend of mine decided on completing a project together.  She is very skilled with sketching and I make an effort to be skilled in painting and creativity.  So, we combined our resources and set on our course to surprise Shannon with her very own art piece.

First, allow me to introduce the artwork that started us down the path and caught the attention of Shannon.


This is a piece by artist Monica Furlow titled Button Tree 0006.  This is one piece among many that draw out the spirit of artistry enchanted by childhood and imagination.  Taking an item in nature and embedding childhood imagination in the story is what inspired Leah and I on our quest.

Rather than trying to recreate an exact replica, we chose to use this as an inspiration or springboard for our own artistic creativity while keeping Shannon and her personality in mind.  So, we set on our quest to see if we could accomplish this artistic feat.

We began by utilizing Leah's skill with sketching.  She is very serious in this process and wanted to make sure she did the artist justice.  She focused on sketching the tree for which we would paint around.


We then headed to the background.  Mixing the acrylic paint colors together and trying to find depth in the background was fun.  I used a paint brush to complete this process.  The beautiful part of this coloring experience is NOT having to always stay in the lines.  Rather it was fun letting the paint dictate the lines.


The next endeavor in our mission was the background within the tree itself.  Mixing the colors was an experiment in trying to blend with our background, but allow it to stand out on its own.  We added more blues in this arena to add a bit of personality.

From there, it was the tree itself.  In staying within the parameters set by Monica Furlow's drawing, depth was important.  This particular task took a bit of time.  The mixtures of purple and grey with white and black allowed for that depth to shine.


In consideration of every tree with the ability to have leaves, we chose to fill in the tree leaves even though we knew we would be doing a lot of work on top of that paint.  With a sponge purchased from the art store for a dollar, we mixed a color together for this level of the painting.  I guarantee you there were very few base colors used in this painting.  Part of the artistic mark, was creating our own colors as we went by mixing some magic.


While the top half dried, we started plotting our attack on the wispy and dramatic grass in Monica Furlow's painting.  We decided to go a little more dramatic and let the colors do the talking in our painting.  It may not show as much balance as her artwork does, but it fit our mood and what we knew Shannon would love.

More color mixing happened.  We also edited a fan style paint brush by cutting pieces out to offer a more dramatic stroke and less work in the end.

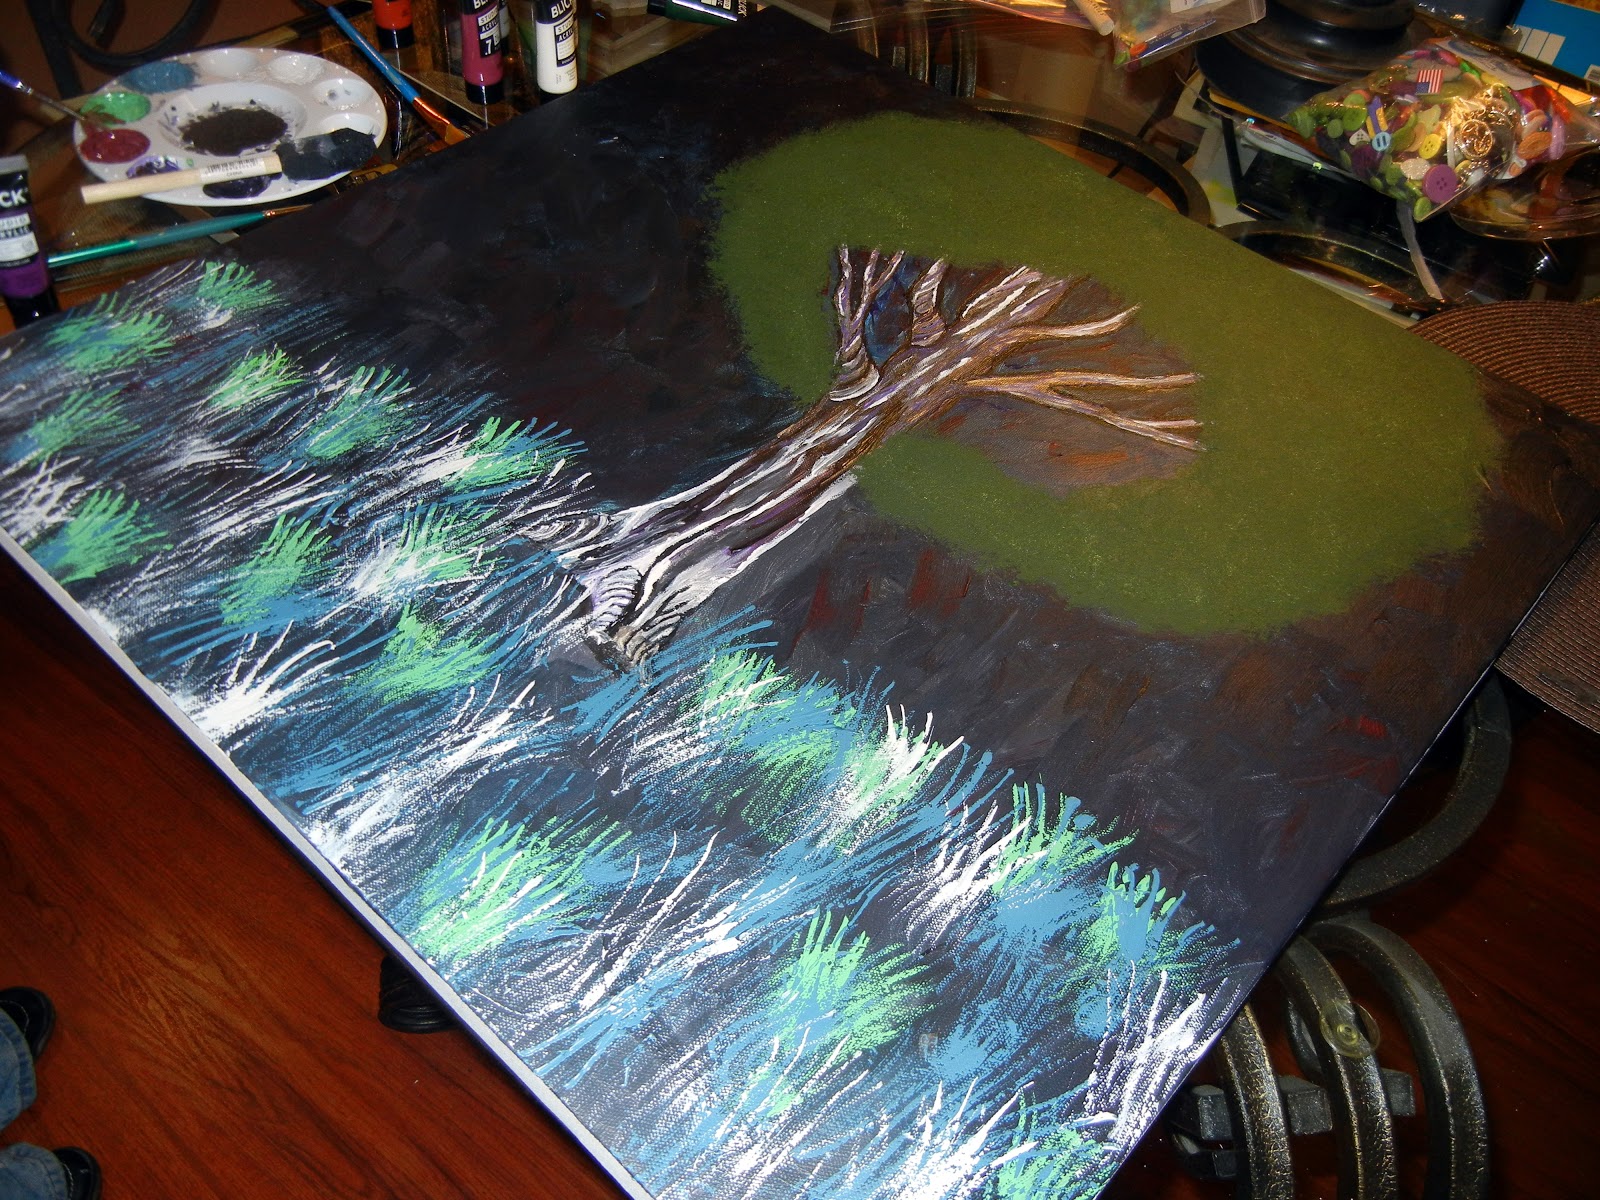

While Leah had been panicking during day one, my turn was in day two.  I was worried about the incredible green shade I had chosen.  But, by continuing with layering of colors, we found what we were trying to reach.  We layered colors upon colors.


Now, for the piece de la resistance!  We had been debating about whether Monica Furlow had painted the buttons or used real buttons.  I still believe they are painted.  We decided to use real buttons.  Incredibly charismatic buttons that would create balance with the moodiness and reality of everything else within the painting.  This is when we reached into our inner child and played.  It almost gave the Virgo within me an anxiety attack, but I let that go as we let our creativity and mission come to fruition.

Hot glue gun and hundreds of buttons in hand, we continued our mission.


Yes, we used real buttons.  We located bags of miscellaneous buttons at Michaels.  We then selected a few other buttons we knew Shannon would like specifically (tie dye peace sign buttons).  We laid them out and then set to hot gluing them.  The only mission was to not have the same buttons in one area or too much of the same color.

We also added a little more of Shannon's free spirit and humor in the mix by adding the frog, butterfly and dragonfly buttons as supporting characters.


We signed our picture and surprised her the next day at our friend Meaghan's house while planning her baby shower.  I told Leah that Shannon would cry.  She didn't believe me, but sure enough she cried.  She was so surprised and in love with our interpretation of the painting she had fallen in love with earlier this year.

So, I am not sure there is a moral of this story, other than go for it.  And just because you are working from someone else's work does not mean it needs to be a replica.  There is much joy in taking an inspiration and making it your own for someone else who is so deserving.  I would hope that the artist would find it a compliment that her work inspired amateur artists to go for it!

Monday, August 6, 2012

Office Redo Inspired By a Temper and a Painting

I admit I can have a bit of a temper.  A lot of time this flare up of my temper is after a time frame of pent up frustrations.  The smallest frustration at a certain point can cause my temper to surface.  In response to this I sometimes sulk or yell.  Every once in a while, I use my temper for good and not evil.  My Office Redo is one of those cases.

I was in a temper at my boyfriend at the time and was walking by my "office", which at the time was nothing but a room with junk and bad carpet (disgusting really).  So, for some unknown reason, I found a razor blade in the garage and proceeded to rip the carpet out.  I spent hours moving furniture into the bedroom, rolling up carpet and avoiding assistance to carry the garbage carpet down the stairs.  Once I was finished...I had no idea what to do with the room.  While the offensive and smelly carpet was gone, I had nothing to replace it.

Evidence #1 - Mid carpet removal and I started taking pictures of the disaster.
Evidence #2 - Junk, junk and more junk as well as a whole lot of white.
Evidence #3 - The adornment above the closet was the leftover plastic from the ceiling redo...several years earlier.
In speaking with my ever helpful mother, she told me she had purchased some laminate flooring she was no longer going to use.  And, things started to click.  The baseboards would come out and be replaced.  I am a firm believer that is the fastest and easiest face lift to a room.  The walls needed painting and the room needed a big purge session. 

I have a painting that used to be in my grandmother's office that has always held my attention.  It reminds me of one of my favorite poets, Robert Frost, and his poem The Road Not Taken.  So, this would be my inspiration piece for the room and I would draw warmth and browns from the piece.

My inspiration piece.
The color for the walls I chose is called Tender Twig.  I loved the color, but I may have loved the name more!  All the walls were painted and the flooring was going in.  Please note in the picture the underlay is actually upside down.  This is a big no-no as this can create shifting of the flooring later on as I found out.

Do not lay your underlay upside down.
Clean, white baseboards were put in using a circular saw and a family friend.  New door base was also added to give the feel of luxury.


Lowes actually has door moulding kits that are pretty cheap.  Next I need to dress up other areas of the room.  I went to TJ Maxx, Burlington and Ross and located some wicker baskets for closet storage.  I also located some unique and a little "mismatchy" items to place above the closet.  I am not a big fan of using fake plants, because I don't want to dust them.


I chose some items a little outside and inside the scheme of the room's decor.
Closet reorganization.
Keeping the existing shelving, I painted a fresh coat of paint.  I also removed the clunky doors and added artistic linens using linens from Anna's Linens in two colors and a curtain rod.  Some tie backs were used to swag the space and offer an open feel.

The desk area was also cleaned up and adorned with a rich piece of art.  I love the look and feel of maps as they remind me of history and travel.  I also added a bit of differing texture in the room using a shag style rug that is still low key enough it works well.  I also like working on the computer without shoes, because of the rug.

This shot was mid clean up.  I also donated the Nintendo video games and am still in trouble with my brother.
I cleaned up a work space that is a scrap booking table.  This is great for storage.  It is also on wheels and can open up even further.  I may still dress the window.  I just have not been able to commit to a linen yet.  I am thinking some solid to contrast the linens used on the closet.


Finally, I added personal items to the room.  This includes some caricature drawings.  I love the personality and unexpected that they add to the room.


Moral of the story: every once in a while your temper may be a good thing?  Not sure if those are words to live by as this type of project start and finish is not always the result nor is it guaranteed.  I enjoy the space and love the touches that exist every once in a while that almost do not appear to belong.

This particular room was done a few years ago and is under review for some more updates.  I think the chaise may be replaced with a futon lounger so the room may double as a guest room.  But, then again, I may change my mind a couple more times.  And, that is just fine.

Saturday, June 16, 2012

How To Transform Kitchen Cabinets Cheaply

I have a very small kitchen and had the wonderful idea of painting it a deep red when I moved in.  As time has passed, I realized my mistake and that the color was drowning out my kitchen.  Plus, my cabinets are cheap and yellowy in color.  So, transformation time in my kitchen.

Before
First necessity was a paint color.  I needed something to work with my living area while defining my kitchen space. I was looking for a more elegant and chilled out color.  So, I went to Home Depot and picked up samples in peach and brown.  I painted them on a wall and selected Applesauce Cake by Behr.  The nice thing about samples... they are a couple dollars a piece and help ensure that you are happy with your decision before putting a lot of money and work into the wrong paint color.

Applesauce Cake by Behr
Next thought...cabinets.  I am not in the market to spend a lot of money so buying new cabinets was not the ideal decision.  The decision process first started with: to STAIN or to PAINT the cabinets.  After doing some research, it turned out the decision was fairly simple.  If you appreciate the wood grain then stain.  If you don't care about the wood grain then paint.  I selected the paint option.

Going back to Home Depot, I selected several samples ranging from mahogany to brown.  I painted the samples on the interior of the cabinet and selected rich mahogany.


Take the cabinets down with a drill by removing the screws that hold up the brackets for the cabinets.  The cabinet inserts can be removed at this time and not painted if you plan on replacing them.  Using a skill saw you can cut out the inserts.  Also, remove the inner ledge from the cabinet doors.  Saving these inserts will assist in cutting out the replacement pieces. 

Paint one coat, let it dry overnight and paint another coat.  Add polyurethane as you deem necessary for the sheen you are grabbing.  I selected satin paint for ease of cleaning, but opted to add some polyurethane to contain the color better and add more sheen.

While the cabinets are down, also paint the cabinet structure with two coats of paint.


Spray paint the brackets while they are off the cabinets.  I used black spray paint. Again, two coats are recommended. 

Upon drying use the brackets and drill to screw the doors back into the cabinet structure.

If you are using something else for the cabinet inserts, now is the time to get busy on those pieces.  In this case, I elected to use polycarbonate glass.  One piece worked for all of my upper cabinets and can be located at Home Depot for $50. 

The nice thing about polycarbonate glass is that it is light but still sturdy, economical and can easily be worked into a design.  I found that the beveled glass inserts were about $25 per square foot.  Polycarbonate sounded better and better to me!

Using a circular saw, you can cut the polycarbonate glass to fit the inserts you have saved from the cabinets.  Some articles lead you to believe that a razor can be used to cut this glass and that is WRONG.  You need something sturdier.


I ordered some regular glass film from WalMart.  You may need fancier and more expensive cabinet glass film if your cabinets have a lot of direct sunlight.  If not, then you can use the $25 per roll selection that I grabbed.  I order in Mosaic and waited the week for it to be delivered to the store.  I ordered two rolls, but only needed one.  This can easily be returned to your Walmart store by grabbing an online return receipt from the website.


The scene is set...a squeegee, spray bottle with water, glass cleaner, razor and the Lexan polycarbonate glass cut to fit the cabinets.  First, clean the polycarbonate glass and then spray with water.


You can actually use less water than pictured above.  Actually, it is better to use less water as the film will become slippery.

Unroll the film on the table, place the polycarbonate glass on top and use the razor to outline the glass and cut through the film. 

Remove the backing and place on the glass.  You can continue to place the film until you have the fit you want.  The nice thing with this process is that there is not any glue application, which allows some room for initial error.


Spray the top of the film with some more water.  Then, using the squeegee, lightly but deftly flatten the film out until it fits perfectly to the glass.  Keep in mind, there is not glue involved so it can still slip.  This process is dependant on static from the polycarbonate glass and the water application.


I also used a paper towel to clean the excess water from the top.  Then, flip over the glass and trim the remainder of the film using the razor knife.


Once completed, place in the divot of the cabinet.  You can use masking tape to hold the piece in place while you apply the glue.


We used Tub & Tile sealant in clear as the glue to place the glass.  Using the sealant, apply a line of sealant to the bottom and top of the glass on the interior of the cabinet.  The sealant needs to be used on the glass portion of the insert and NOT on the film itself. 

Leave the film facing out.  This will allow for easy clean up in the future as well.  A nice note to this process, is knowing that fingerprints will not be an issue down the road as it would be with actual glass.


Continue to use the masking tape while the sealant dries.  Allow to dry overnight and then apply a second coat and remove the masking tape.


Adding hardware can do great things for cabinets, as well.  It also reduces the need for additional clean up as paws will only be working with the hardware rather than the entire door.  I located a set on EBay for $20 and used it for all of my cabinets and drawers.  Drill a hole and attach using the screws that come with the hardware.


Voila!  $95 gave my kitchen cabinets the uplift they needed including the hardware.  Now, I am adding to my to do list...the painting of the shelf lips.  Also, during this makeover, I updated with decor above my cabinets (see previous blog).

A big journey for my kitchen cabinets, but I feel like they are all grown up!!

Now onto the appliances...I think black will do nicely.  And, no...I will not be replacing them.  I checked out black appliance paint and it is $30 for a six pack.  I smell some more home redressing!

Monday, May 21, 2012

Building a Frame Out of Chair Railing

I have a beautiful Klimt "Kiss" oil painting.  A reproduction, of course.  It will work beautifully with the color scheme downstairs.  My Grandma told me when I first moved in that it was too intimate to put downstairs, so I have had it in my bedroom.

Back to the idea of my own rules.  The painting is moving downstairs.  I love it with the color scheme downstairs.  I have talked to my G-ma again and she states she does not recall ever saying that and has proceeded in trying to locate more Klimt reproductions to marry with the "Kiss".

The Kiss by Klimt before the frame is created
My reproduction has some white appearing at the top and since it is being placed in my more elegantly styled downstairs, I decided it needed a frame.  So, as usual I went snooping on the Internet for a 3' by 4' frame to encase my painting.  The frames I liked were a bit more than my wallet liked.  I got to thinking something could be created.  After wandering around Home Depot, I spoke with my very crafty mother and she thought of moulding.  In the moulding area of Home Depot, I located chair railing.  Bingo!

Chair Railing with some nice detailing to keep with an elegant look.
I love some spray paint.  I bought some chair railing for $20 and Hammered Copper Spray Paint for $12.  A wood chisel was also purchased for $8.  I spray painted the two chair rails with the Copper making sure I did clean sweeps when spray painting so I would not get drops or weird blobs.  The nice thing about using spray paint with texture is that you have room for error.

Hammered Copper Spray Paint meets Pine Chair Railing.
The wood chisel allows you to chisel away any additional ledge you may need on the back to fit the picture (and cover the white space in my case). 

Measure width by length for the chair railing.
After allowing the paint to dry and chiseling the ledge, you need to measure the angles (45 degrees).  A miter box (about $10) can be used to cut the angles.  Wood glue the corners together on the painting and attach clamps to allow the glue to dry.

Here is my framed oil painting.
Copper wire and screws (on the upper portion of the frame - far right and left) were used to hang the painting.  This was all purchased at Home Depot for about $5.  At the end of the day, I spent about $155 on this piece.  The piece itself was about $100 at an oil reproduction shop a couple years ago.

I am still debating on adding black, iron corner pieces.  What do you think?  I also think a mate may be better in this space.  The Kiss is center with the living room start but not the windows.  I may be nit picky, but I think this may clarify the space and make a bit more sense with the space available.  Still debating.  This is an ongoing process and my addiction.

Wednesday, May 16, 2012

A Little Paint Goes A Long Way - Updating with Spray Paint

You want to make a statement really quick?  Take a look around your house.  What are the little things that you may take for granted that could make a BIG statement?

For starters, what about stair railing (if applicable)?  Is it really making the statement you want to make with your decoration efforts?  Mine was not.  I am working with Brazilian Cherry flooring, Tuscan paint colors and bold statements.  My stair railing is white.  Is that really the statement I want to make?  Not if I want to continue to GO BOLD.

White Stair Railing and pulled up flooring up my staircase.
After consideration I thought a great pop to my house would be a black stair railing.  Not only a pop of color, but a great way to keep the stair railing from showing dust and dirt.  Brown paper being taped off through the staircase and some flat Black Spray paint could make a nice showing.  Make sure to cover your floors, too!  The spray paint rains down.


Should have put something on the floor.  Goof Off was used to clean the floors without any issue.


2 coats of Rustoleum spray paint and a coat of gloss polyurethane made this happen.  Polyurethane protects and ensures the gloss coat I wanted.  Oil based polyurethane was chosen as it does a better job of protecting the paint job than water based.  With hands on the stair rails, I needed the best protection possible. 

The polyurethane chosen was MINWAX for its ratings and ease in applying.  A cheesecloth to apply the coat was all that was necessary.  Some time to make sure it is dry before using is certainly advised.

Another paint effort was with the gas valve cover on my fireplace.  I have gone with copper, bronze and golds downstairs.  A silver gas valve cover and key on my fireplace is obviously unacceptable.

Silver Gas Cover and Key is not going to flow with my color scheme.
A little Spray Paint in Hammered Copper sounded like a good idea.  The gas cover and key were removed pretty simply.  Then sprayed with two coats.  Again this is a two coat process.  Let it dry and then re-attach.  A $5 can of spray paint makes a big difference.


For about $35, big statements were made with really little effort.  I think it makes a huge difference and love it.  If I had not loved it, the nice thing is that I could have simply painted again.