Monday, July 2, 2012

Creatively Thrifting

A year ago, I would not imagine myself completely addicted to thrifting.  But, here we are...I love finding deals.  I love finding homes for discarded items and I love thinking outside the box for these items.  Most of the time, the items I locate require some work with paint, cleaners, re-working, etc.  Every now and then, the thrifting angels smile upon me and it is only a matter of making it happen.

This weekend my mother, a friend and myself set out for thrifting following my triangulation scheme of preferred stores.  At Goodwill, I located some iron items that seemed fit for my Tuscan inspired dining area. 


I currently have a beautiful, large mirror from my great-grandmother's house in the dining room, but some adornment would work wonders.  Some beautiful ironwork would be a great offset to the gold, but can be pricey.

As luck would have it...there were some plant holders in iron for $3 a piece at Goodwill.  Also, nearby I located some iron candle holders that I envisioned to round out the look of my adornments.  These were $2 each.  So, my thoughts take me to getting a great look for $10 without additional work.

I cleaned the pieces up with soap and water and got to making my vision happen.  The cashier at Goodwill informed me the pieces were for plants.  I told her I needed them for wall decor.  She stared at me a moment and then said, "Well, if you are creative, that could work."  The gauntlet was thrown down in that moment!


Votives are the missing element here.  I picked up 6 for .50 each at Walmart.  They did not fit quite right and I have another candle piece with Amber votives that work perfect.  I traded the amber votives from the other piece with the new votives from Walmart.  Voila!  There is light and ambience that matches the intended look.


I love putting my own touch on the items as I redress my house, but sometimes it is nice when they just fall into place.  A little creativity and this wall is complete.  I can't believe anyone wanted to just use the top pieces as plant holders.  I was shocked those were the purpose as I only saw them in the space as decor.

To each their own.  As long as you follow whatever may be "your own" there will be success in your endeavors.

Saturday, June 16, 2012

How To Transform Kitchen Cabinets Cheaply

I have a very small kitchen and had the wonderful idea of painting it a deep red when I moved in.  As time has passed, I realized my mistake and that the color was drowning out my kitchen.  Plus, my cabinets are cheap and yellowy in color.  So, transformation time in my kitchen.

Before
First necessity was a paint color.  I needed something to work with my living area while defining my kitchen space. I was looking for a more elegant and chilled out color.  So, I went to Home Depot and picked up samples in peach and brown.  I painted them on a wall and selected Applesauce Cake by Behr.  The nice thing about samples... they are a couple dollars a piece and help ensure that you are happy with your decision before putting a lot of money and work into the wrong paint color.

Applesauce Cake by Behr
Next thought...cabinets.  I am not in the market to spend a lot of money so buying new cabinets was not the ideal decision.  The decision process first started with: to STAIN or to PAINT the cabinets.  After doing some research, it turned out the decision was fairly simple.  If you appreciate the wood grain then stain.  If you don't care about the wood grain then paint.  I selected the paint option.

Going back to Home Depot, I selected several samples ranging from mahogany to brown.  I painted the samples on the interior of the cabinet and selected rich mahogany.


Take the cabinets down with a drill by removing the screws that hold up the brackets for the cabinets.  The cabinet inserts can be removed at this time and not painted if you plan on replacing them.  Using a skill saw you can cut out the inserts.  Also, remove the inner ledge from the cabinet doors.  Saving these inserts will assist in cutting out the replacement pieces. 

Paint one coat, let it dry overnight and paint another coat.  Add polyurethane as you deem necessary for the sheen you are grabbing.  I selected satin paint for ease of cleaning, but opted to add some polyurethane to contain the color better and add more sheen.

While the cabinets are down, also paint the cabinet structure with two coats of paint.


Spray paint the brackets while they are off the cabinets.  I used black spray paint. Again, two coats are recommended. 

Upon drying use the brackets and drill to screw the doors back into the cabinet structure.

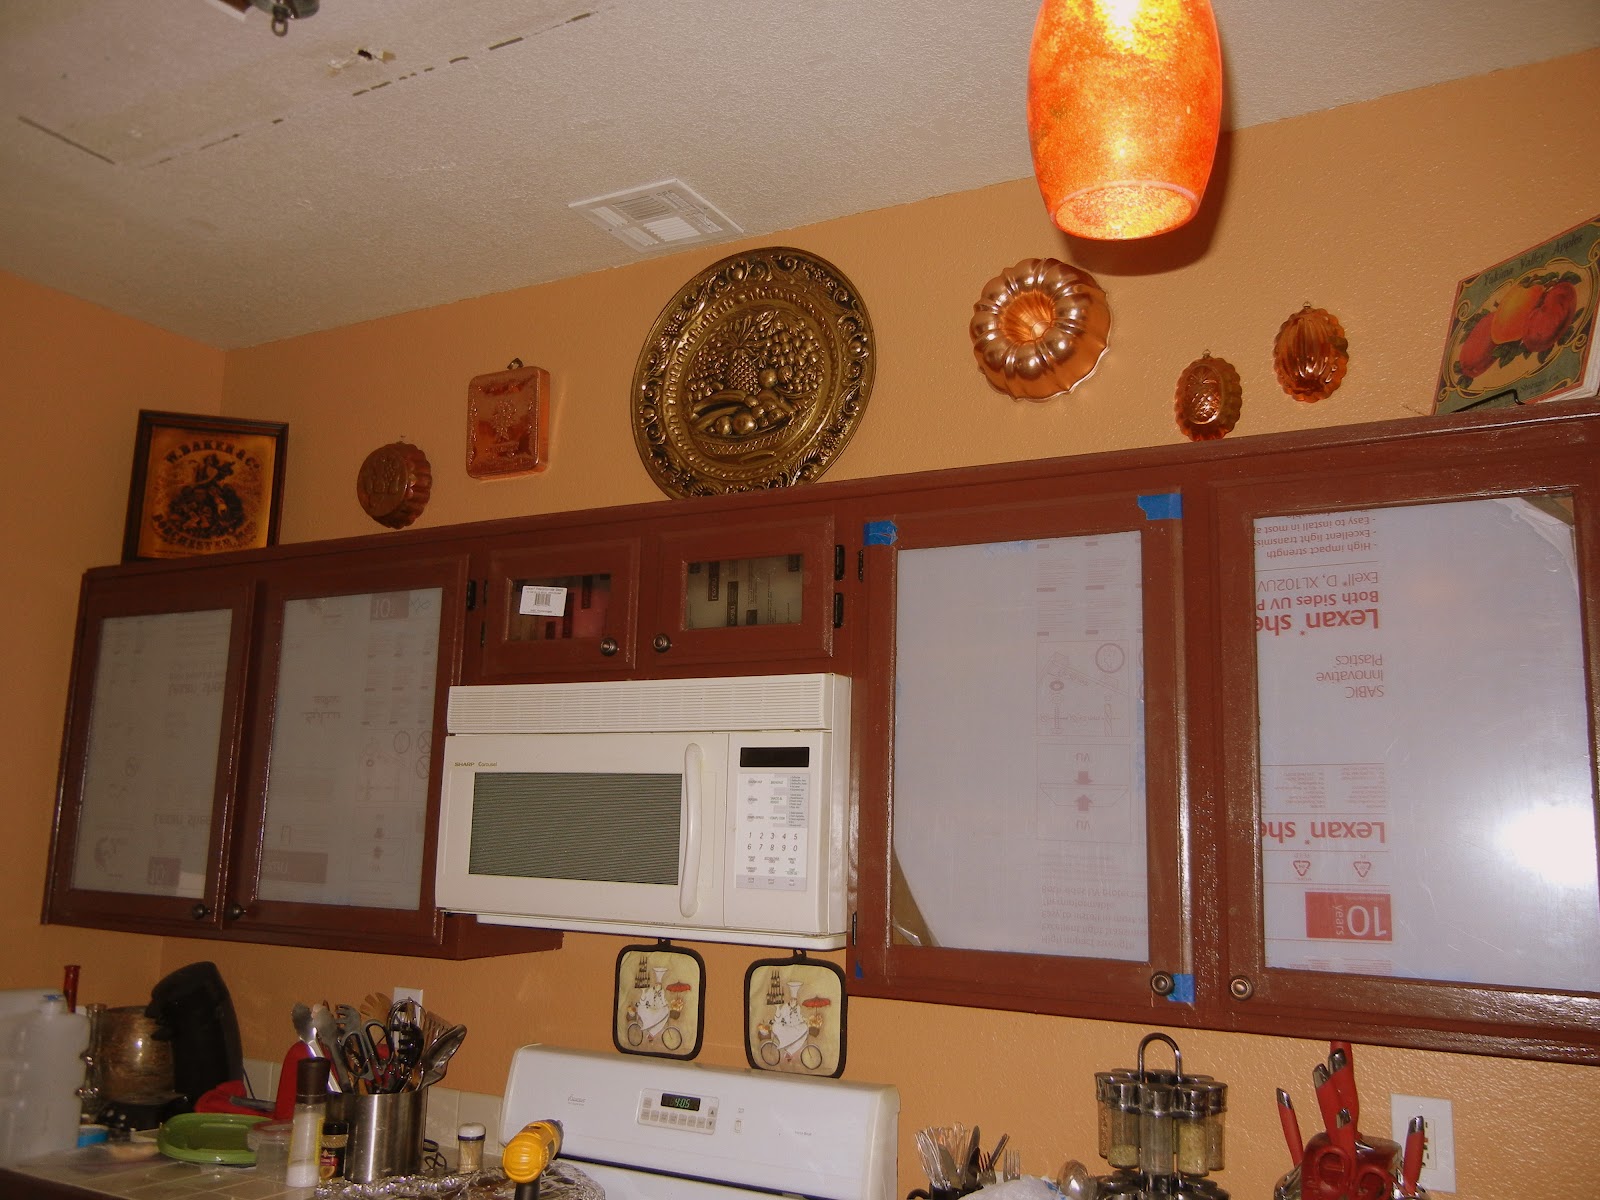
If you are using something else for the cabinet inserts, now is the time to get busy on those pieces.  In this case, I elected to use polycarbonate glass.  One piece worked for all of my upper cabinets and can be located at Home Depot for $50. 

The nice thing about polycarbonate glass is that it is light but still sturdy, economical and can easily be worked into a design.  I found that the beveled glass inserts were about $25 per square foot.  Polycarbonate sounded better and better to me!

Using a circular saw, you can cut the polycarbonate glass to fit the inserts you have saved from the cabinets.  Some articles lead you to believe that a razor can be used to cut this glass and that is WRONG.  You need something sturdier.


I ordered some regular glass film from WalMart.  You may need fancier and more expensive cabinet glass film if your cabinets have a lot of direct sunlight.  If not, then you can use the $25 per roll selection that I grabbed.  I order in Mosaic and waited the week for it to be delivered to the store.  I ordered two rolls, but only needed one.  This can easily be returned to your Walmart store by grabbing an online return receipt from the website.


The scene is set...a squeegee, spray bottle with water, glass cleaner, razor and the Lexan polycarbonate glass cut to fit the cabinets.  First, clean the polycarbonate glass and then spray with water.


You can actually use less water than pictured above.  Actually, it is better to use less water as the film will become slippery.

Unroll the film on the table, place the polycarbonate glass on top and use the razor to outline the glass and cut through the film. 

Remove the backing and place on the glass.  You can continue to place the film until you have the fit you want.  The nice thing with this process is that there is not any glue application, which allows some room for initial error.


Spray the top of the film with some more water.  Then, using the squeegee, lightly but deftly flatten the film out until it fits perfectly to the glass.  Keep in mind, there is not glue involved so it can still slip.  This process is dependant on static from the polycarbonate glass and the water application.


I also used a paper towel to clean the excess water from the top.  Then, flip over the glass and trim the remainder of the film using the razor knife.


Once completed, place in the divot of the cabinet.  You can use masking tape to hold the piece in place while you apply the glue.


We used Tub & Tile sealant in clear as the glue to place the glass.  Using the sealant, apply a line of sealant to the bottom and top of the glass on the interior of the cabinet.  The sealant needs to be used on the glass portion of the insert and NOT on the film itself. 

Leave the film facing out.  This will allow for easy clean up in the future as well.  A nice note to this process, is knowing that fingerprints will not be an issue down the road as it would be with actual glass.


Continue to use the masking tape while the sealant dries.  Allow to dry overnight and then apply a second coat and remove the masking tape.


Adding hardware can do great things for cabinets, as well.  It also reduces the need for additional clean up as paws will only be working with the hardware rather than the entire door.  I located a set on EBay for $20 and used it for all of my cabinets and drawers.  Drill a hole and attach using the screws that come with the hardware.


Voila!  $95 gave my kitchen cabinets the uplift they needed including the hardware.  Now, I am adding to my to do list...the painting of the shelf lips.  Also, during this makeover, I updated with decor above my cabinets (see previous blog).

A big journey for my kitchen cabinets, but I feel like they are all grown up!!

Now onto the appliances...I think black will do nicely.  And, no...I will not be replacing them.  I checked out black appliance paint and it is $30 for a six pack.  I smell some more home redressing!

Thursday, June 14, 2012

How to NOT fall down Wood/Laminate Stairs

I recently added laminate wood to my stairs - OK, my idea and purchase - My Uncle actually did the placement and hard work.  It looks beautiful, however it is slippery! 

I was trying to be careful and one day I actually bit it going down the stairs.  RED FLAG!  I have been looking at stair tread, but really don't like the idea of covering my flooring.  Plus the prettier stuff is a bit pricier than what I would want to pay.


So, I found the solution in a spray can at WalMart.  Krylon Non-Skid Coating spray in clear for decks, etc.  About $4.00 a can.  I bought 2.  You clean up your floors as normal and spray about 6 inches away.  This creates a texture on the stairs that ensures stability versus slippery when traveling your stairs. 

You cannot tell a difference other than you actually may not fall down the treacherous stairs.  To the touch, you can actually feel a texture difference creating an invisible tread.

I only needed one can, but thought that maybe 6 months down the road I may need to touch up.  You never know.  My Uncle and I had looked at Home Depot previously in the spray can section, but could not locate anything. 

No change to the look of the stairs.  I am happy with this easy enhancement!


Monday, June 11, 2012

How To...Not To

I am on the road for my job and always love the travel.  However, I have become pretty antsy about finishing my kitchen and other projects.  I am going crazy during my off time on the road wanting to play with recipes, spray paint and lamps.

For those of you who knew me previous to this year's newest obsession...who am I?  I love it, but am in constant shock!

A few years ago, I was buying the coffee mug that said "Domestically Disabled" and now I am ready to put paint to the paper, plug in the hot glue gun and develop a new recipe using fresh spices.  It is incredibly refreshing to gain confidence in something I never thought was my cup of tea.  I am home in a couple days and ready to get some appliance paint for the kitchen!

Maybe I should put the aforementioned mug on my upper cabinets as an homage to past days.  I have more ideas stewing for that area and hope that my favorite shops on Etsy.com (http://www.etsy.com/shop/LavenderGardenCottag) and (http://www.etsy.com/shop/LoveToFeatherTheNest) have some more cool items that are on my hit list or at least inspire my hit list.

I am still checking Fab.com and Ebay.com and Amazon.  Time to get home...so my "How To" is not a How To...Not To any longer.

I actually brought a lamp with me on this trip to paint, but am pretty tired at the end of the day.  Plus I forgot a screwdriver to open my paint can.  Yeah, that is it.  I forgot the screwdriver.  I even brought a garbage bag to protect the area where I would be painting (not spray painting).  There is no way I am paying for a desk.  However, there my lamp sits...unpainted.  Maybe I am only inspired while at home?

Wednesday, June 6, 2012

How to Easily Decorate Above Your Upper Kitchen Cabinets

In considering decorating above my kitchen cabinets, I considered fake plants, but hate the idea of constantly dusting them.  I was not really sure what direction to head, so I left the space empty and unused.  My mom and I were chatting about this particular issue and she brought up the fact that my Grandmother would use copper jello molds to decorate.  Running with that idea I wanted to intersperse vintage signage and vintage jello molds.

Off to the thrift stores I went.  I also spent some time on Etsy.com locating some great finds.  I purchased several jello molds from Goodwill, Salvation Army and Etsy.com.  I also found a large circular piece.  I decided this should be my center.

Before Clean Up

My center needed a bit of clean up.  Nothing too aggressive, so I used Goof Off wipes that I found at Home Depot.  Quick and efficient clean up.


After Clean Up
Now, onto the other pieces I had located.  I used another Goof Off Wipe and cleaned them up, as well.


I needed to drill a hole into the top of my "center" piece.  I used a drill bit and had a hole in a second.  I then placed the beginning of my design.


Obviously, the kitchen is undergoing other projects at this time as well.  I am using Polycarbonate Glass for Cabinet inserts.  I am waiting for the film to come into Walmart so that can be applied.  The protective film is still on at this point to protect from scratching.  Also, the fluorescent lighting is done in my kitchen being replaced by a refinished chandelier.

From the point of my center, I selected pieces to add to the wall. I did not want all circles or everything completely level.  However, I am still a Virgo and need a bit of a pattern.  So I selected specific items to work with each other.  I like to imagine this process like reading a book.  Left to right...does it make sense?

I hammered the nails in and placed the remainder of the pieces.  I found picture stands at thrift stores for $1 each and used those to anchor my signs.  I wanted a little depth so I chose not to hang them.

Upper Cabinet Kitchen Decor
I was a little nervous about mixing all of the different metals.  I also considered more clean up on a couple pieces, but decided I like the vintage feel more.  Moral of the story...go for it!  I think it looks great.  I added some elegance to my kitchen for about $50 for all pieces. 

I may still add another horizontal sign or two...but that is why this addiction is never ending and always fulfilling.

Tuesday, June 5, 2012

How To Host a Brown Bag Wine Tasting Party

A fun idea I stole from my friend Zel who stole it from another friend is a Wine Tasting Party.  Simple and fun! 

First:  Choose a Wine (Cabernet Sauvignon is always a favorite)
Second:  Set a Price Cap ($15 per bottle of wine)
Third:  Invite Some friends (each will bring two bottles of wine)
Fourth:  Get some brown paper wine bottle bags (your grocery store will give them to you)
Fifth:  Appetizers, palette cleansers, water, etc

Every month we are trying to host at one of our houses.  As guests arrive, the wine is taken to a secret location (shhhh).  Then one bottle from each person is logged with an assigned number.  The wine is then bagged and taped or rubber banded and the number written on the bag.  You can get fancier with your bags, if you like.  I like the brown bag irony when drinking wine at a wine party.

The wine is brought out and everyone takes a tasting of all wine.  You can have pre-printed sheets with a rating system you create.  Or, if you are me, I just handed out notepads and pens.  1st, 2nd and Last were selected.  Parties differ in size which can contribute to determining the method of voting.  I went easy, because I had around 16 people.  Most of the time the party is around 6-10 people.

As people take tastes, they note the rating or their favorites.  The fun of this party is that this can take a couple hours of mingling and tasting.  When everyone is completed with their tasting, the score cards are collected.  These score cards determine:

1st Place:  Takes the majority of the second bottles home that they select first.
2nd Place:  Takes a few bottles that are leftover.
Last Place:  Takes their own bottle of wine home.

A great time is had and it is truly amazing how different everyone's palette really is as some enjoy bold while others enjoy mild.  I like to serve cucumber sandwiches, chocolates, oyster crackers, goldfish, and meat/cheese trays.


Make sure your guests are truly aware of the wine selection.  I selected Syrah and people showed up with Shiraz.  No need to panic, disclose the information and have a good time!

"In Vino Veritas!" ~~> "There is Truth in Wine!"

Test Kitchen: How To Make "Explosive Showerhead Cleaner"

My quest continues now that I have become obsessed with the idea of homemade remedies for little money. A household problem I have that impacts quite a few people in Las Vegas is hard water stains.  My shower head is big and constantly afflicted with hard water stains.

Enter the Frugally Sustainable website I located via Pinterest.  An easy recipe for removing hard water stains from your shower head.  How could I pass on testing this one out?

Recipe Directions are listed below from the website (http://frugallysustainable.com/2011/11/explosive-showerhead-cleaner/).

1/3 cup Baking Soda
1 Cup White Vinegar
1 large, plastic bag
Twist Tie

"1. Mix baking soda and vinegar in bag over a sink. Caution: Pour vinegar into bag slowly, there is an “explosive” foaming action that kicks in.
2. Place bag over showerhead. Be sure it is submerged in the baking soda/vinegar solution.
3. Secure with twisty tie.
4. Let the showerhead soak in the solution overnight or for at least 2-3 hours.
5. Wipe off showerhead prior to use."
 
Keep in mind, my shower head is large.  I tripled the solution above.  Then the bag was a little too heavy for my twist tie to hold.  I used painters tape since I have so much of it from all of the paint projects.
 
Dark Shower head and Hard Water is not a good combination.
As you can see above, my shower head was not completely submerged in the baking soda portion.  Maybe taping it up higher would have worked better?
 

I call this a 90% improvement.  Even dry the hard water stains are almost gone.  I did the soak for about 3 hours.  I plan on doing this simple trick again in a few months.  Notes to self: get the shower head more submerged into the baking soda portion and soak overnight as indicated in directions.

I am a fan of this one and the other items on the blog.  So much so, I added the Frugally Sustainable Blog link to my page.